Post Top Ad

Post Top Ad

Monday, September 29, 2008

Sunday, September 28, 2008

11:41 PM

Clickable Flash Maps: DIY Map

DIY Map is a zooming & clickable map, built with Flash, that can be colored with data from a text file.
Using an external data helps using the same Flash file for representing different information.


When a point is clicked & zoomed, any information can be displayed like a link or an address.
List of maps that can be downloaded are world map, USA map, Europe map & few other countries.
The application is free for personal & educational use and requires a licence for commercial use.

Requirements: No Requirements
Website: http://www.backspace.com/mapapp/

Friday, September 26, 2008

9:52 PM

Basic Working TOOLS

Learn Photoshop
Basics Photoshop Working
TOOL BOX
Getting To Know The Work Area


The Photoshop Environment

Adobe Photoshop is an image editing software that can also be used to create original artwork. It can get images into the program by scanning a photograph, a slide or by capturing a video image. This session begins with the discussion of the work area of Adobe Photoshop, which is an assortment of tools for producing sophisticated graphics for the web and for printing. This session also tries to explore the multiple ways to add and manipulate color in an image.
Interfacing with the Work Area

The work area of Adobe Photoshop consists of a menu bar at the top, a floating toolbox on the left, floating palettes on the right and bottom. In addition to the tools, the work area of Adobe Photoshop is also a place where one or more document windows can be opened manually.


Using Photoshop Tools

Before creating sophisticated, eye-capturing images using Adobe Photoshop, we have to get acquainted with the various tools in the toolbox and how to use them. A tool is an instrument or a means or a device to work with. The typical Adobe Photoshop toolbox is shown on the screen. The toolbox is divided into 8 distinct groups of tools and controls. The first four groups are dedicated to individual image-editing tools. A small triangle to the right of a toolbar icon indicates a submenu like the Marquee Tool. The last three groups allow selection of foreground/backgrou nd colors, editing modes, screen display options and the ability to jump to a default graphic editor application.


Tools - Group One

The image shown on the screen represents the tools belonging to group one. All these tools are image selection and modification tools.


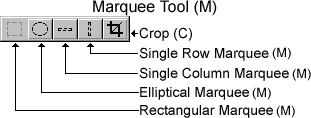
Marquee Tool

The Marquee tool, belonging to group one has a small triangle to the right indicating a submenu. The items of the submenu are shown in the image. They are the Rectangular, Elliptical, Single Row, Single Column and the Crop formats. These tools can be used to select a particular area of an image. Crop is used to trim the image.


Move Tool

The image shown on the screen is known as the Move tool. It is used for moving the selected area of an image or the entire area if nothing is selected.


The Lasso Tool

The Lasso tool shown on the screen consists of a submenu, each item of the submenu is used to select an area of an image by drawing an outline around it. The different types of this tool are: Lasso, Polygon Lasso and Magnetic Lasso.


Magic Wand Tool

The Magic Wand tool shown on the image is used for selecting a particular area of an image based on its color. By adjusting the tolerance range of the selection, we can control how large an area will be selected. When selecting a consistently colored object, we do not have to outline it with the Lasso tool.


Tools - Group Two

The image shown on the screen is a collection of tools that are primarily used to apply, or manually manipulate, color in an image. This set of tools belongs to the second group.


Airbrush Tool

The Airbrush tool shown on the screen is used to apply color in a soft or feathered stroke. This tool is helpful in creating shadows, highlights or graffiti painting.


Paintbrush Tool

The Paintbrush tool is used to apply color in a uniform width with either soft or hard edges. This tool is useful for free hand drawing, image blending and blending colors.


Rubber Stamp Tool

The Rubber Stamp tool is shown on the screen. It copies the pixels in one part of an image for application in another part of an image. It finds its use in touching up an image, removing an unwanted portion or object or for duplicating part of an image.


History Brush Tool

The History Brush paints back previous image edits in conjunction with the History palette. The Art History Brush allows for more creative painting and effects, utilizing historical states of an image as a basis for each stroke.

 Eraser Tool

The Eraser tool along with the items of its submenu is shown on the screen. It either applies the background color or converts underlying pixels to full transparency (no color). Thus giving rise to an erasing effect. It is useful for refining the edges of an image.

Line Tool

The Line tool applies color in a uniform width. It is also used to draw arrows; and also change the shape of the arrowheads. The Pencil tool, located under the Line tool is a free hand version of the Line tool.


Blur Tool

The Blur tool comes with three options: Blur, Sharpen and Smudge. The tool with its option is shown on the screen. This tool is used to alter the focus of a selected area of an image though it is not as precise as the blurring and sharpening filters.

 Dodge Tool

The Dodge tool along with its three options of toning is shown on the screen. The three options are Dodge, Burn and Sponge. Using the Dodge tool we can effectively lighten an area on the image. Similarly, using the Burn tool, we can darken areas of an image. The Sponge tool alters the Gray level of the image.


Tools - Group Three

The tools comprising the third group are shown in the image on the screen. It is a wide-ranging collection consisting of a Pen Tool, a Type Tool, a Measure Tool, a Gradient Tool, Paint Bucket Tool (Fill) and Eyedropper Tool.


Pen Tool

The Pen tool can be used to make precision selections using smooth-edged paths. It can be used to edit the location of each point and also to manipulate the shape of the line connecting them. The Pen tools with its seven options are shown in the image on the screen. They are Pen, Magnetic Pen, Freeform Pen, Add Anchor Point, Delete Anchor Point, Direct Select and Convert Point.


Type Tool

The Type tool is used for adding text onto an image. The Type tools with its various options are shown in the image on the screen. The Type tool provides standard Type and Type Mask options for both vertical and horizontal text.


Measure Tool

The Measure tool shown in the image on the screen ascertains the distance between two points in an image. It is used in conjunction with the Info palette.


Gradient Tool

The Gradient tool is used to create a color fade from the foreground color to the background color within the confines of a selection, which can even stretch across the entire page. The Gradient tool shown in the image on the screen includes Linear Gradient, Radial Gradient, Angle Gradient, Reflected Gradient and Diamond Gradient. We can use two or more colors for creating a Gradient.


Paint Bucket Tool

The Paint Bucket tool is used to fill a selected area of an image with a foreground color. The tool is shown in the image on the screen.


Eyedropper Tool

The Eyedropper tool shown in the image on the screen is used to pick color from an existing image. This tool comes in very handy for creating Web graphics.


Tools - Group Four

The tools that make up the fourth group are shown in the image on the screen. These tools are used to enable editing more conveniently.


Hand Tool

The Hand tool as shown in the image on the screen is used to move an image inside the work area. The tool positions the image within the viewing window by scrolling to the area.


Zoom Tool

The Zoom tool is shown in the image on the screen. This tool is used to increase or decrease the magnification of an image for precision drawing or painting.

Wednesday, September 24, 2008

1:39 PM

Koders Helps Finding Open Source Code

Koders is a search engine that is a must-bookmark for developers.
It is used for quickly finding open source code, methods, examples, algorithms and more.


It searches code written in 30+ languages & categorized with 28 different licence types.
Koders also has pluging for Eclipse, Visual Studio & Firefox for integrated searching + it provides adding "code search" functionality to your site with a widget feature.

Website: http://www.koders.com/
8:36 AM

Tips To Improve Website Speed

Info: Every user / developer has different experiences. Any more tips that you share in the comments will be appreciated.
"Why is my website slow?" is a popular question. And it is a vital problem for a website.
Faster the website, happier & more the visitors. That’s a well-known fact.
There are several factors that may slow a website. In general, all of them can be solved. This just depends on how much effort you can spend on it.

How much time do you have?

You may not have enough time to spend on speeding up your website. Depending on your free time, you may choose the steps to apply like mentioned below:
  • I have very limited time: Apply step-1, step-2, step-4 & step-5 (only the compression parts) and step-6.
  • I have some time: Apply all of them except step-3 & step-8.
  • I rule the time: Go with them all.

Most of the tips are the ones that you probably know. So, you can use the list as a checklist (which it normally is in my "customer notes sheet" : ) ).
Here are the tips:

1. Get A Fast & Less-Loaded Web Server

This is a must. Whatever you do to make your website faster, if it is served slow, there’s nothing to do.
Make sure that the server your website is hosted has low ping values & it is not over-loaded. Specially if you’ve a database and/or using dynamic files (like asp, asp.net, php, ruby..) server over-load can kill the performance.
If you’ve a simple website with few visitors then shared hosting is ok. For a website getting popular, think of a VPS with guaranteed RAM & CPU usage. If the website is already popular, a dedicated server will be the best performing one.

2. Know When To Use GIF, JPG & PNG Files. 

Playing with the quality of images will dramatically lower the sizes of them while they will still be looking good.
GIF is suitable for images with few colors like logos, text & line art. When saving a GIF file, make sure you use a small color pallette (learn more).
JPG is good for images with lots of colors & details like photographs. Decrease the quality of a JPG image before saving. It will still look good for a web image (learn more).
PNG, a format specially for websites, has great quality - both transparent & non-transparent - is specially functional when you’re in need of quality transparent images. Don’t forget that IE6 has problems in displaying them (learn more).

3. Use XHTML - No Tables

This is easy to tell but may be harder to implement for anyone that has few experience with XHTML.
The thing is, tables are rendered slower than DIVs by browsers. You can do more with less code & no need to say it is much better to be compatible with any browser (including mobile browsers), in means of SEO, etc..

4. Use CSS Smartly & Compressed

  • Mention every style in CSS files.
  • Find the common properties in objects, define them once & try not to repeat them.
  • If using a significant amount of totally different properties for a specific page, define them in another CSS file & only include on that page. So users viewing other pages won’t need to download those properties.
  • Compress your CSS file (you may try this, this or this).

5. Merge & Compress JavaScript Files

Try merging JavaScript files prevent multiple includes (see step 6).
If a JavaScript file will be used only in few pages, try to include them inside those pages only (like CSS in step 4).
Compress JavaScript files. It lowers the size seriously & doesn’t have any bad effects on your side. This & this are some of the popular compressors.

6. Manage Included Files Better

There may be several files included in webpages like CSS files, JavaScript files and other JavaScript files for statistic services, social bookmarking sites, widgets & more.
Try to decrease the number of these files:
  • If using digg-reddit-like voting widgets, don’t use them in stories that won’t hit the frontpage & remove the ones that were submitted few days ago as they won’t have any help after sometime.
  • Use only 1 statistic service if possible. Every web-based service requires new files to be installed & they are called each time a page is loaded.
  • Host files on your side & don’t use web addresses as file paths.
    • If you’re using any JS frameworks like jQuery or MooTools, don’t call the .js files from their websites but download & upload them to your website.
    • Don’t try to call any file from a web address like "http://.." as this always requires dns queries to be done & will work slower.
  • PHP Speedy (WRD post)is a very effective solution that does all the combining & compressing automatically. You may want to try it.

7. Use HTTP Compression

HTTP compression is one of the most effective step with a little effort.
Today, almost every browser & web server supports HTTP compression. Using it, your files are sent to the visitor compressed & un-compressed on their side & you can have up to 90% success for the text based files (like HTML).
You have 2 popular choices with this:

8. Better Coding

This is for websites which does not use any ready-to-use systems like Wordpress, Drupal, ExpressionEngine or similar (if you’re using these then you’re lucky as they are already well-coded).
Besides the better XHTML & CSS coding, the dynamic coding of the website directly effects the performance.
As you can guess, this is a huge subject. But there are some major things like:
  • Seperate the static & dynamic content. This will help writing less-code.
  • Create smart & effective functions. For ex: if you’re going to use a user’s name & birthdate at the same page, don’t run 2 queries or functions, your function must call 2 of them. Simply, try to do everything once.
  • Connect to the database as few as you can & once connected, call only the data you need.
  • Try to keep database sizes small. If you’ve a large database, sometimes seperating it into several databases perform better, specially for the data which is reached not so often. From the server’s point of view: 4-250mbs of dbs perform better than 1-1gb of db.

9. Cache Webpages

Caching is a superb way of decreasing the stress on the server by running more static files & less queries. It simply saves a static, HTML version of the page to be displayed & displays that file rather than the dynamic one.
For CMS applications like Wordpress, there are already ready-to-use caching plugins (like WP-Cache). For PHP, here is a great article from SitePoint.
A small note, caching can also be done at the web server level. But if you’re on a shared hosting account, you better be lucky to have it on.

What Do You Suggest?

Besides the tips mentioned above, what are your tips to make websites faster?

Saturday, September 13, 2008

7:23 PM

FancyZoom For jQuery And Prototype

FancyZoom, a Lightbox alternative which has a Mac-like zoom effect, is now ported to jQuery & Prototype. Best of all, now, they can present any HTML.


They also have some additions to the standard FancyBox like:

  • The zoom will close when clicking outside the zoom box area.
  • Hitting the esc key will close the zoom window.
  • Passing an option of closeOnClick: true into the fancyZoom function will close the zoom when the contents are clicked as well. This works great for image galleries.
Click here for the jQuery version & here for the Prototype version.

Requirements: jQuery or Prototype
Compatibility: All Major Browsers
Website: http://orderedlist.com/articles/fancyzoom-meet-jquery
Website 2: http://orderedlist.com/articles/fancyzoom-meet-proto...
Demo: http://orderedlist.com/demos/fancy-zoom-jquery/
4:14 PM

Add Chat (Text And Webcam) To Your Website With toksta

toksta* is a free instant messenger with text & webcam based chat support.
It is a hosted application that can be integrated to your website & user database. With this feature, your users won’t have to re-login to the messenger.
toksta* also provides plug-ins for phpBB2, phpBB3, punBB, phpMyForum and vBulletin.


toksta* lets you customize the design via an easy to use configurator & you can upload your logo to the application.
Another nice feature is the revenue sharing. The revenue of ads that are shown during the chat is shared between the site owner & toksta*.
Besides these, toksta* has unlimited parallel chats, automatic webcam detection, buddy list integration supoort & more. Click here to see all the features.

Requirements: No Requirements
Compatibility: All Major Browsers
Website: http://www.toksta.com/
Via: http://mashable.com/2008/09/05/toksta/
1:10 PM

Winners Of 3D Wall Pro Giveaway

10 days ago, a post was published at WebResourcesDepot announcing a giveaway of 3 3D Wall Pro licences.

To remember:

3D Wall Pro is a Papervision3D powered, very good looking & interactive wall that can display:
  • Images
  • Youtube & streaming videos
  • SWF files
  • Flickr images

And, here are the winners:

  • Matio (comment #15635)
  • Pablo Pasqualino (comment #15529)
  • Kitten (comment #15709)
Thanks to everyone for contributing & keep following WRD for fresh web resources & giveaways.

Website: http://www.flashloaded.com/flashcomponents/3dwall/
10:03 AM

Tiny And Free Flash Mp3 Player: Dewplayer

Dewplayer is a tiny & free Flash mp3 player with a very clean interface.

It comes in 3 sizes:

  • Mini (160×20)
  • Classic (200×20)
  • Multi (240×20)


When play button is pressed, the mp3 player downloads & plays the file.
Multi version can play any number of files via a simple preivous & next navigation.

How to use it?

Usage is very easy. Defining the mp3 file to the HTML where the Dewplayer is inserted is enough. Just like:

<object type="application/x-shockwave-flash" data="dewplayer.swf?mp3=test.mp3" width="200" height="20">


<param name="movie" value="dewplayer.swf?mp3=test.mp3" />

</object>


An online XHTML code generator for the player is also provided for easier integration

Requirements: No Requirements
Website: http://www.alsacreations.fr/dewplayer-en
Via: http://www.pixey.de/mp3-flash-player-zum-unkomplizie...

Friday, September 12, 2008

9:45 PM

Use Lightbox From Flash: flashLightBoxInjector

Lightbox is generally used with HTML coding. In order to start it from Flash, here is a good solution.
flashLightBoxInjector, is a PrototypeJS class that connects Flash and Lightbox2. Besides starting an already existing Lightbox driven gallery, it also lets you dynamically build a list of images to show through Lightbox.


The great thing about flashLightBoxInjector is that its usage is not limited to Flash only, as the JavaScript can be called from anywhere you like.
Here is a working demo (click twice to fire the Lightbox).

 Requirements: Prototype
Website: http://www.bram.us/projects/flashlightboxinjector/
Demo: http://www.bram.us/demo/projects/flashlightboxinject...